How can we help you?

Help Center

Apple

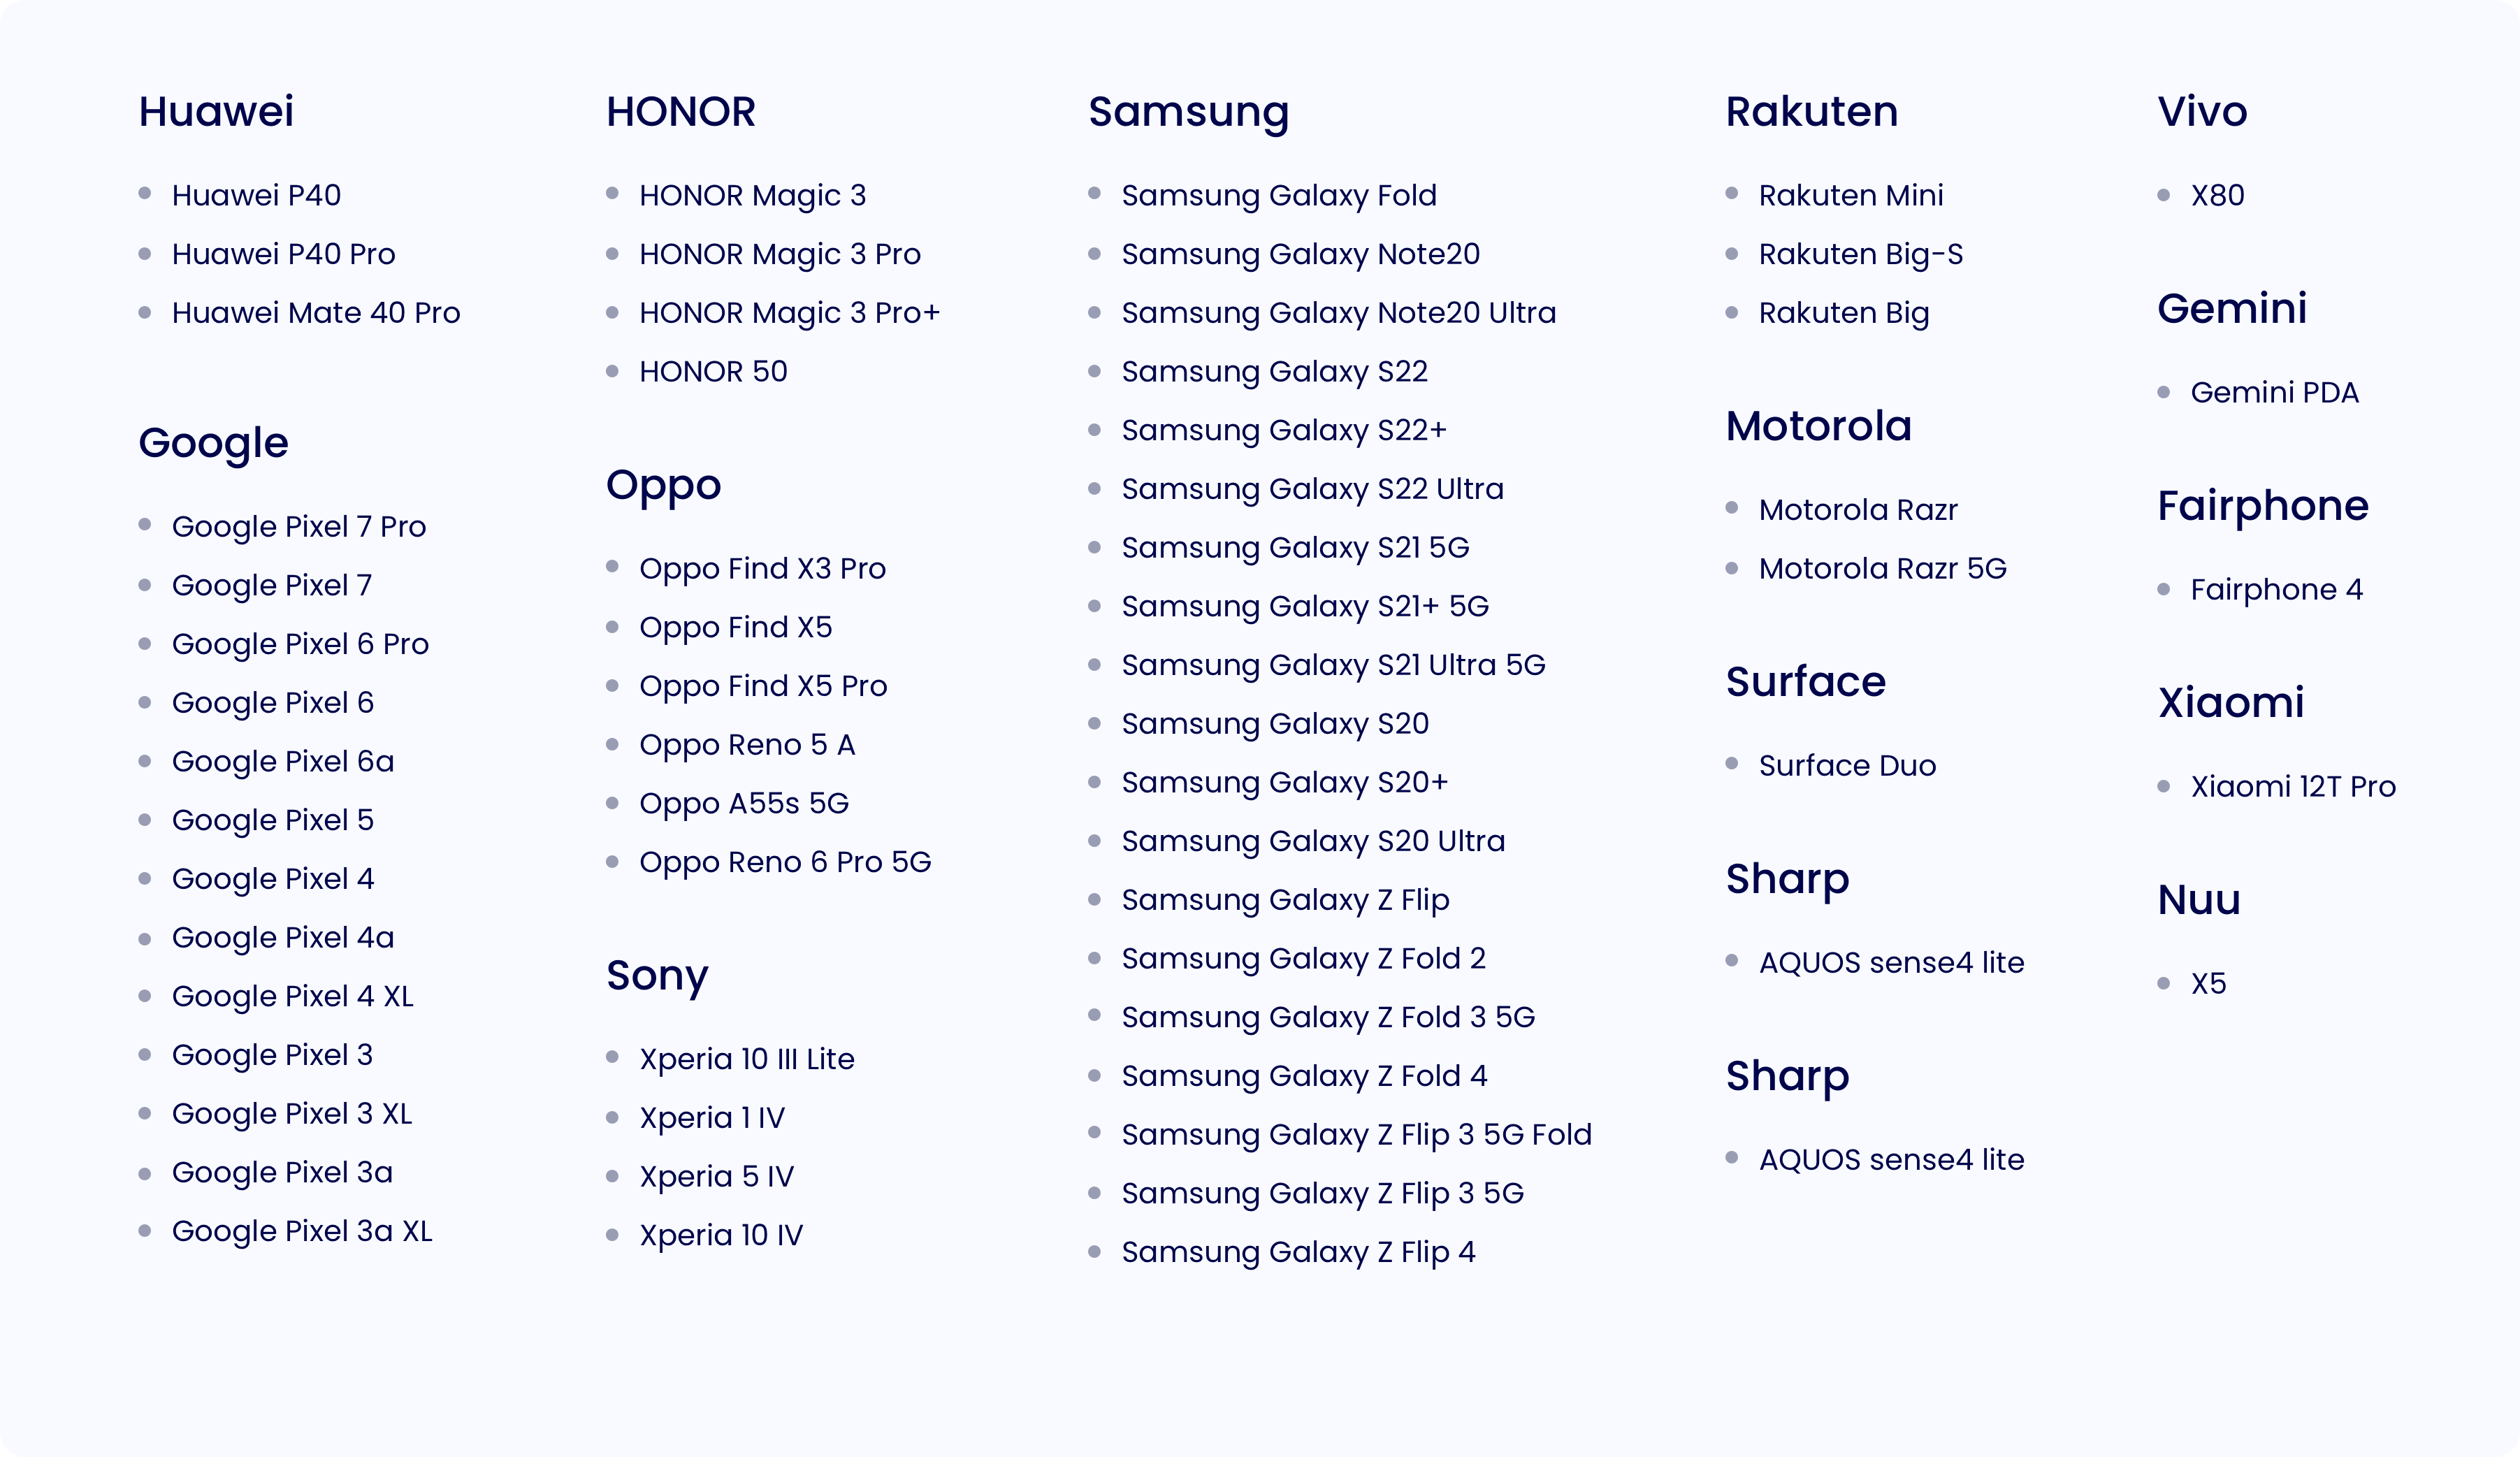
Apple iPhone Xr, Xs or newer

Android
Pixel 4 or newer
Samsung Fold or newer
Huawei P40 or newer
Windows
How do i ckeck if my phone is unlocked?

You can’t use an eSIM with a locked phone.

To check whether your device is locked, please check your device setting as instructions below or contact your carrier. If your phone is locked, you should contact your domestic carrier to unlock your phone before you use the eSIM plan.


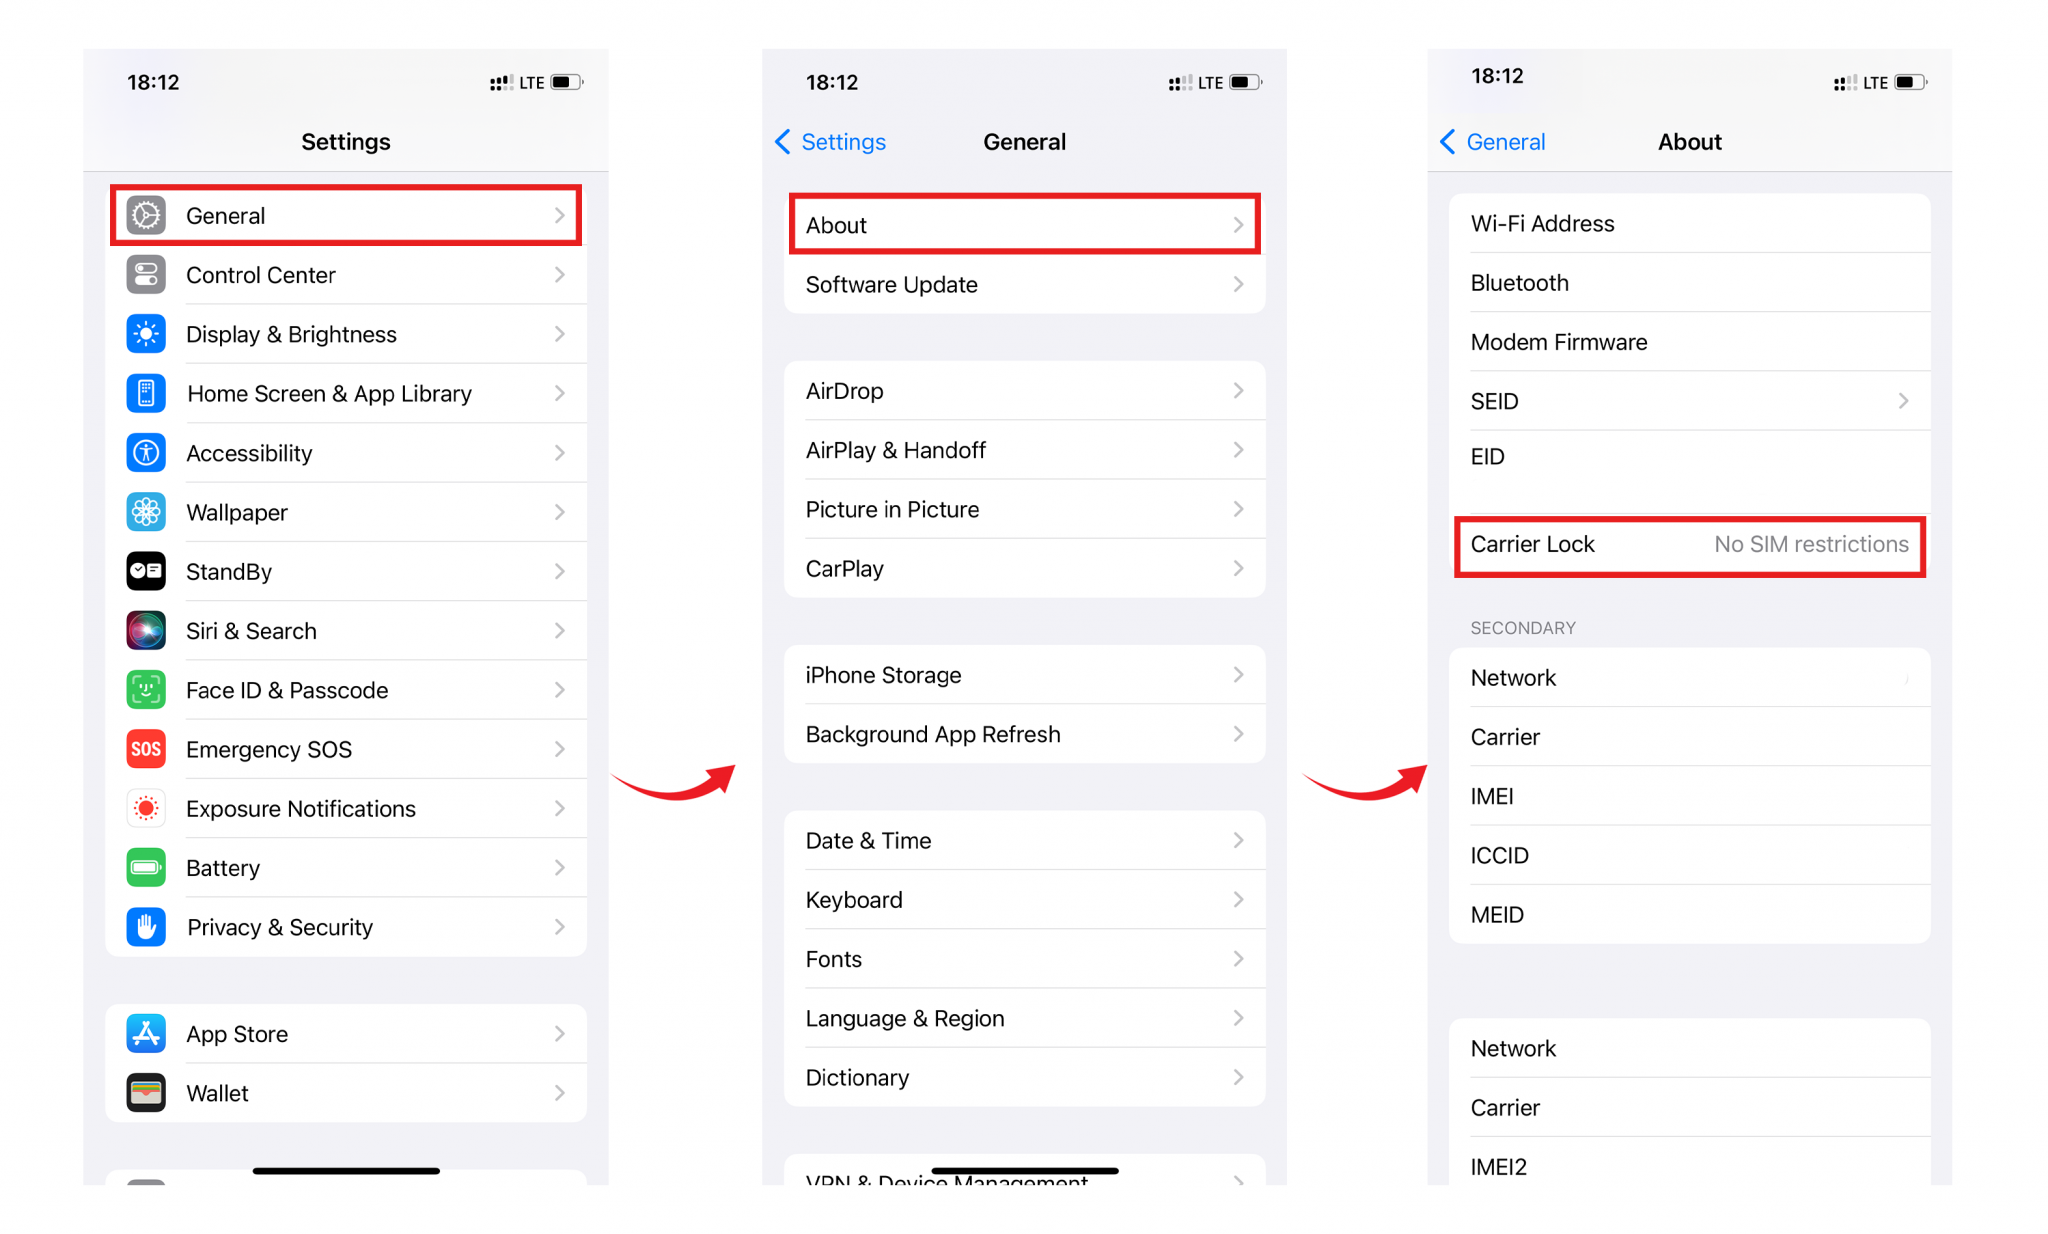
  • Apple
  1. Go to [Settings] – [General] – [About] and swipe down
  2. If you can find “Network Provider Lock – No SIM restrictions” and “Digital SIM – IMEI (number will appear)” your phone is compatible with eSIM
  3. If you find “SIM restrictions”, your phone doesn’t support eSIM


  • Samsung & Google
  1. Go to [Settings] – [Connections] – [Mobile networks]
  2. Select [Networks operators]
  3. If available networks appear, the phone is probably unlocked
  4. If only one result comes back from the network search, or if the Search Networks option is unavailable in the Networks menu, then the phone is most likely locked to the carrier
Install eSim on iPhone
  • Step 1: On your iOS device, go to Settings > Cellular.
  • Step 2: Select Add Data/Cellular Plan/Add eSIM.
  • Step 3: Scan the eSIM QR code that you have received.
  • Step 4: Choose Add Cellular Plan button to save the eSIM details.
  • Step 5: On the screen named Cellular/Mobile Data Plan Labels, select the available label (like Secondary, Business, Travel,… ) or Label your eSIM profile as you want (i.e. Travel eSIM), and tap Continue.
  • Step 6: Set your eSIM profile as the default Cellular Data > choose Done.
  • Step 7: Turn on Data Roaming to start using your eSIM. (We recommend you to do this when you arrive at your destination).

* Notes: Detailed guides for each eSIM plan will be sent in the email after purchasing.

Steps to install your eSIM manually

  • Step 1: On your iOS device, go to Settings > Cellular.
  • Step 2: Select Add Data/Cellular Plan.
  • Step 3: If you cannot scan the QR code sent by your eSIM provider due to a certain reason, you can still activate your eSIM manually by selecting Enter Details Manually.
  • Step 4: Enter the required information including
    • SM-DP+ Address
    • Activation Code
    • Confirmation Code (if required)
    • Then, select Next.
  • Step 5: On the screen named Cellular/Mobile Data Plan Labels, select the available label (like Secondary, Business, Travel,… ) or Label your eSIM profile as you want (i.e. Travel eSIM), and tap Continue.
  • Step 6: Set your eSIM profile as the default Cellular Data > select Done. Switch off the Allow Cellular Data Switching to avoid roaming charges.
  • Step 7: Turn on Data Roaming to start using your eSIM.
Install eSim on Android

Steps to Samsung

  • Step 1: Go to Settings Connections to start the eSIM installation.
  • Step 2: Tap SIM Card Manager (where you can see the SIM cards that are already on your device).
  • Step 3: Tap Add mobile plan (your phone will look for an active plan with the operator already).
  • Step 4: When your mobile plan is found, tap the Scan Carrier QR code and scan the QR code using your camera.
  • Step 5: Select Confirm/Add to save your eSIM profile (depending on your phone).

Manual installation in Samsung

  • Step 1: Go to Settings > Connections to start the eSIM installation.
  • Step 2: Tap SIM Card Manager (where you can see the SIM cards that are already on your device).
  • Step 3: Tap on Add eSIM (your phone will look for an active plan with the operator already).
  • Step 4: Tap on Scan QR code from service provider > Add using activation code.
  • Step 5: Enter the Activation code information that your carrier provided. 
  • Step 6: Select Confirm/Add to save your eSIM profile (depending on your phone). Then, turn ON your eSIM to start to use.

Step to Google Pixel

  • Step 1: On your Pixel device, go to Settings > Network & Internet.
  • Step 2: Tap on the ‘+’ beside the SIM/Mobile network.
  • Step 3: Select Download a SIM instead. 
  • Step 4: Select Next.
  • Step 5: Your device’s camera will be active on the screen. Scan the QR code using the camera.
  • Step 6: Wait for the automatic installation.
  • Step 7: Enable your eSIM to start to use.

Notes: These steps above may also differ slightly based on your Google Pixel models and Android device versions. However, it’s just a little different wording, but the steps are basically. 

The detailed guides will be attached in the email after purchasing.

Manual installation in Google Pixel

  • Step 1: On your Google Pixel device, go to Settings > Network & Internet.
  • Step 2: Tap on the ‘+’ beside the SIM/Mobile network.
  • Step 3: Select Download a SIM instead. 
  • Step 4: Choose Next to confirm your agreement on policies and terms of service.
  • Step 5: Choose the Need help button on the bottom left.
  • Step 6: In the line “Having trouble scanning your QR code?”, choose the option Enter it manually.
  • Step 7: Enter the eSIM code into the box and choose Continue.
  • Step 8: Choose Download to download your eSIM profile. 

* Notes: Detailed guides will be attached in the email after purchasing.

How to contact us?
Please contact us by email:

Email : support@esimjourney.com

Please mention the ICCID that you received in the email with all the instructions.
Or write us in the live chat windows for instant conversations.